WordPress is a free and open source blogging tool and a content management system (CMS) based on PHP and MySQL which runs on a web hosting service. Features include a plug-in architecture and a template system. WordPress is used by over 18.9% of the top 10 million websites as of August 2013. WordPress is currently the most popular blogging system being used on the Web, powering over 60 million websites worldwide.
Documentation
- Installing WordPress
- Installing Sparse
- Installing Plugins
- Import XML file (demo content)
- Setting Header
- Page Templates
- Page Builder (Visual Composer)
- Creating Pages
- Setting Homepage
- Create Portfolio item
- Create Portfolio page
- Create Blog posts
- Create Blog page
- Creating custom page titles
- UberMenu
- LayerSlider
- Contact Form 7
- Theme Options
What is WordPress
Installing WordPress
Please click on button below and read all about installation and other stuff. It is really easy.
Installing Sparse
When you will download Sparse wordpress theme you will get sparse-package.zip file. First you have to unzip it. Then you will see folder called “sparse-package”. Inside this folder you will see files listed below.
- documentation
- index.html – documentation file
- sparse-preview.xml – exported xml of our preview page
- layer-sliders.txt – exported txt of your demo LayerSliders
- sparse – folder with our Sparse theme files
- licesing
- psd
- sparse.zip – zipped Sparse theme files
Installing plugins
We added some great plugins to our WordPress theme Sparse for best and easier working with this theme. Sparse theme comes with plugins listed below.
- Visual Composer (page builder)
- Layer Slider
- Revolution Slider
- Contact Form 7
- Ubermenu
- Ubermenu Sticky
After theme activation
Step 1:
After you will activate theme Sparse you will get notice for installing plugins. Check image below. You have to click on “Begin installing plugins”.

Step 2:
After you clicked on “Begin installing plugins” you will be redirected to plugins list that you have to install (see image below). Please first install plugins Contact Form 7, Layer Slider, Revolution Slider and Ubermenu (this plugins you can install at once). Plugin Ubermenu – Sticky install last. It’s important to first install Ubermenu and then Ubermenu – Sticky.
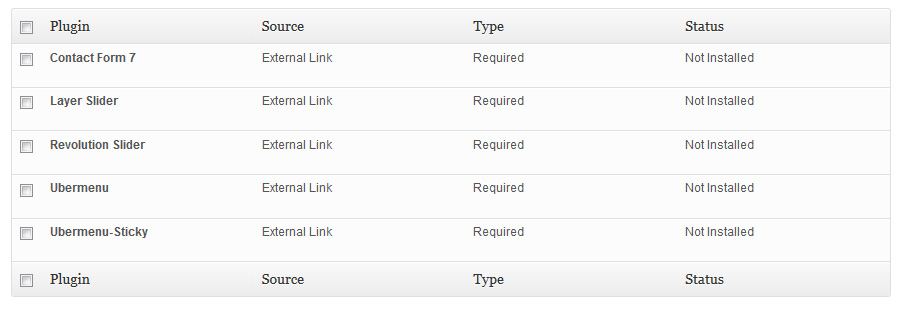
Supported plugins
- Yoast – WordPress SEO Plugin
- WPML – The WordPress Multilingual Plugin
- …
Set it "Like in preview"
To get the same layout and content as we have on our preview page, you need to import the exported xml which you will find in sparse-package/documentatin/sparse-preview.xml.
After you have located sparse-preview.xml go to your admin Tools -> Import. Click on WordPress and install the imported (just click Install now).
Once the installer is set, you will get a window where you can upload a file. Do upload the xml we described above. After doing so just click Upload file and import.
When the install procces begins, you will also need to check the checkbox for importing media.
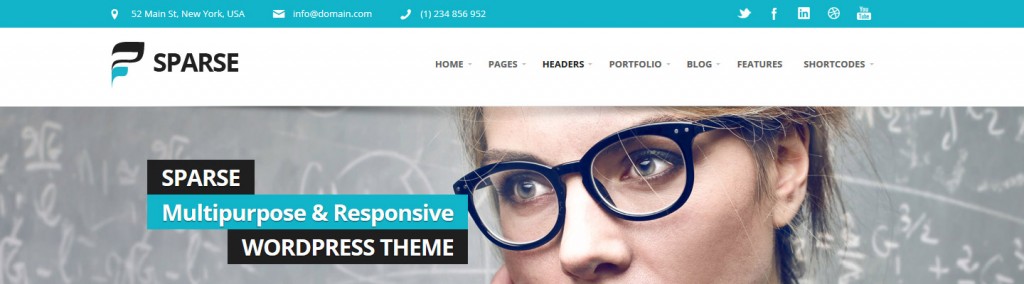
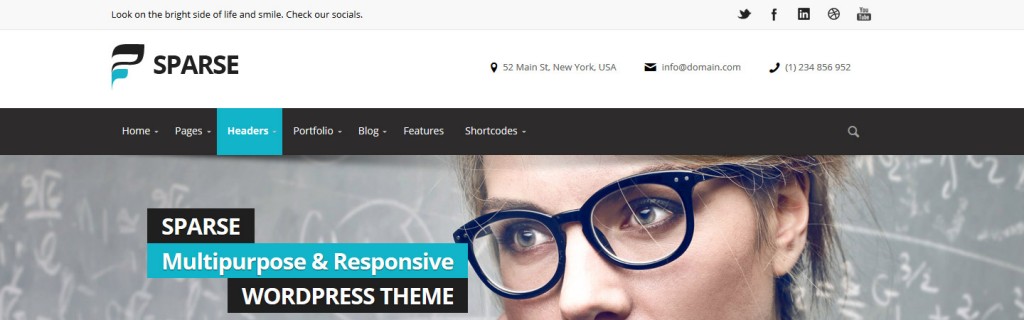
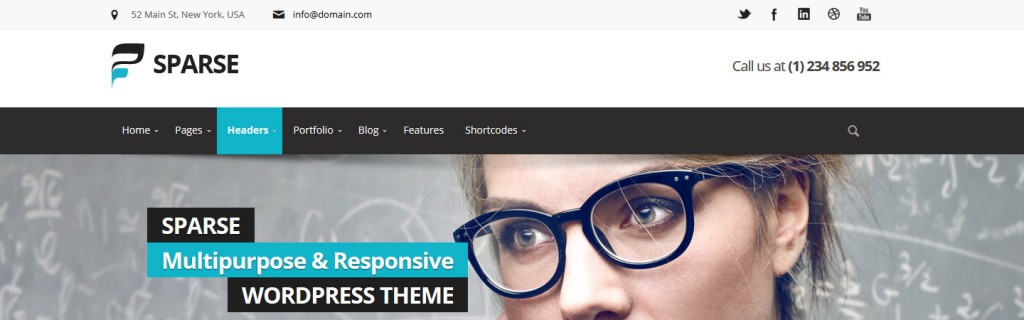
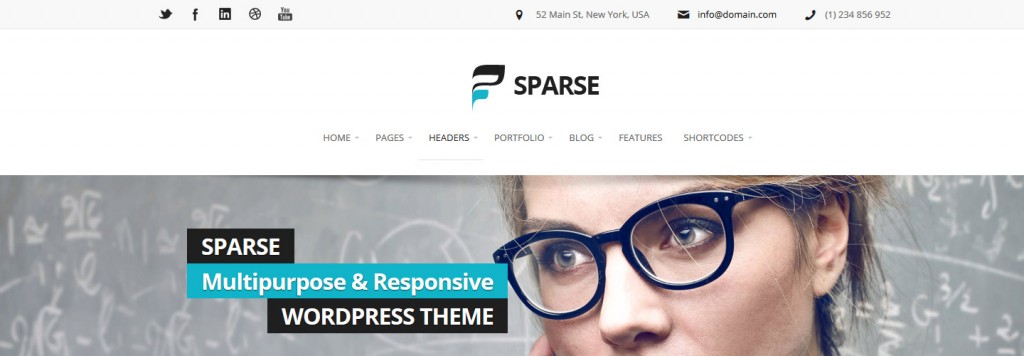
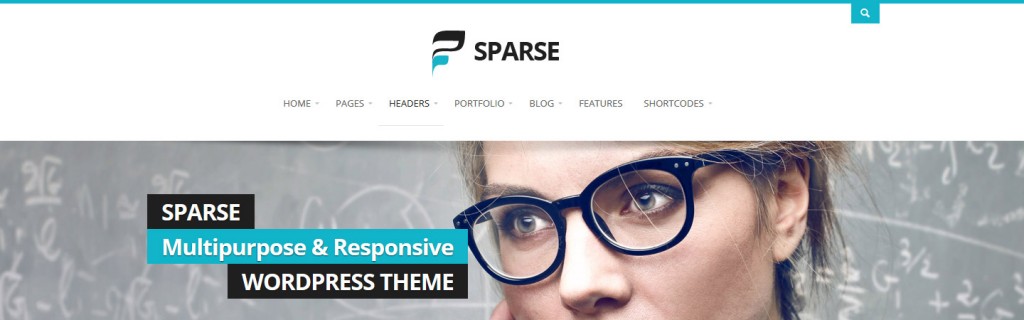
Setting Header
In this chapter we will describe how to set up your header. We predesigned 5 different header layout for Sparse. This headers are:
- Header#1
- Header#2
- Header#3
- Header#4
- Header#5
Header is set from your WordPress admin. Go to Appearance -> Theme Options -> Header Settings. There you may also set the background for header area.
See all headers in live action or click on images for full view in popup.


Page Templates
If you don’t want to import the entire demo but would still like to get the layout for some page from our preview, we have set up the code for separated pages.
To do so just copy the code (click button “Get the code”) of the page you want. New file will opened in new window. Grab that code (copy). Go to the admin of the page you are creating. Make sure you have Classic Editor switched on and not Visual Composer. Also be sure to have the editor set to Visual view. Once you are there, just paste the code and publish the page.
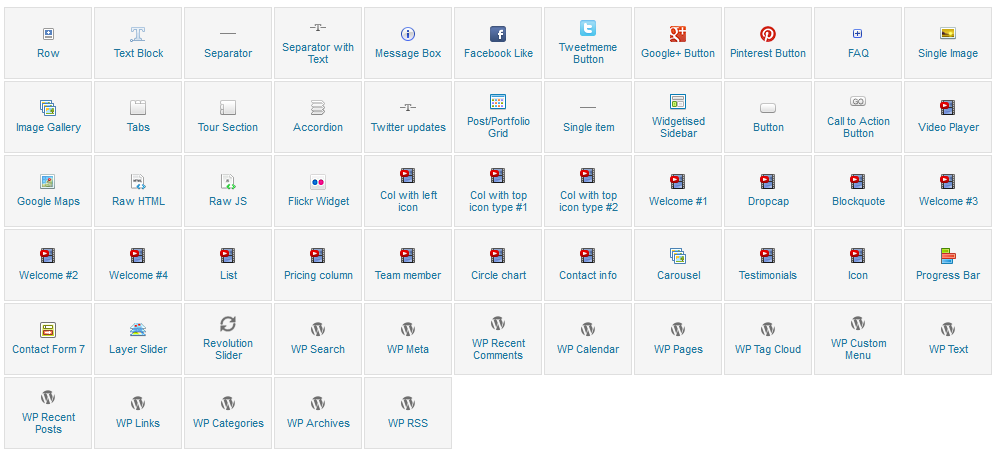
Page Builder (Visual Composer)
Theme Sparse uses Visual Composer for editing pages/posts/portfolios, .. Composer itself contains a lot of shortcodes, which we modified and imporoved. We also added a lot of our own.
Elements/shortcodes available in Sparse Visual Composer:
Creating Pages
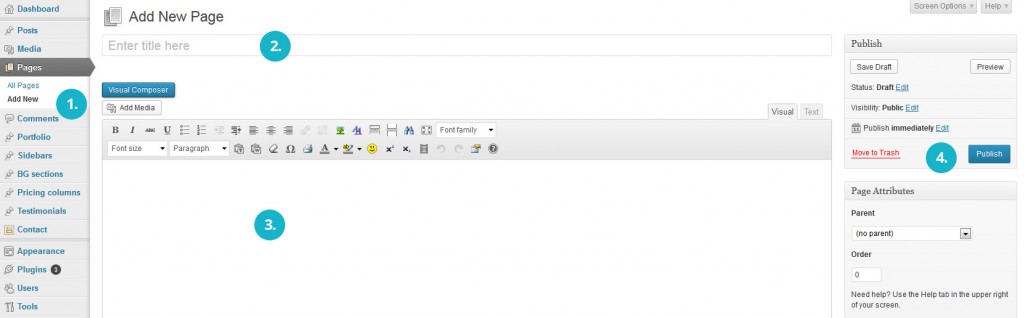
In this chapter we will tell you how to create new page and how to add some content.
- Add new page (Pages -> Add New)
- Write page title
- Create page content (you may use classic WordPress Editor or our Custom Visual Composer)
- Insert content with TinyMCE Advanced visual editor
- Scroll down to see some extra options in custom fields
- Save
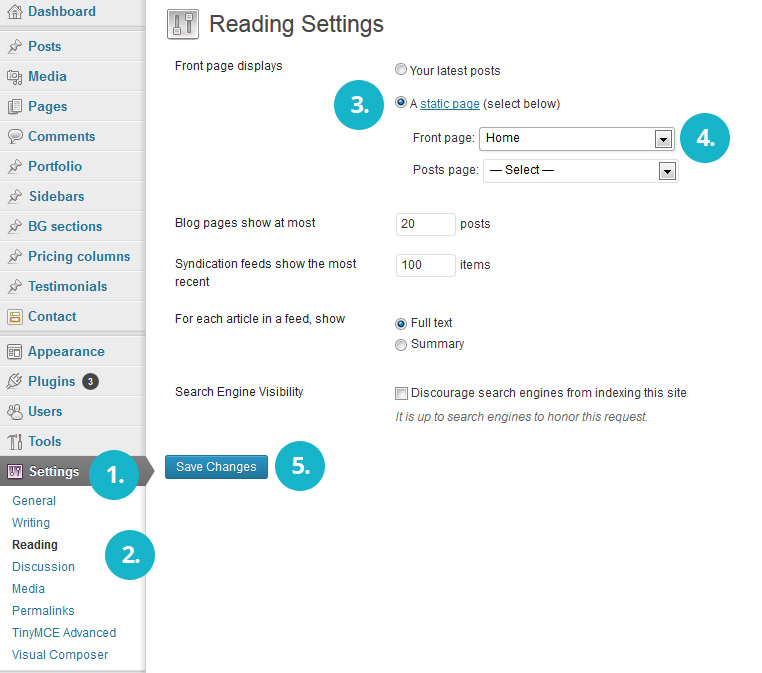
Setting Homepage
For setting homepage you can set any page that you created. First create some page and follow this steps.
- Add new page (Pages -> Add New)
- Write page title
- Create page content (you may use classic WordPress Editor or our Custom Visual Composer)
- Insert content with TinyMCE Advanced visual editor
- Save
- Go to Settings -> Reading
- Choose “Static page”
- From dropdown of “Front page” select one page that you already created
- Save
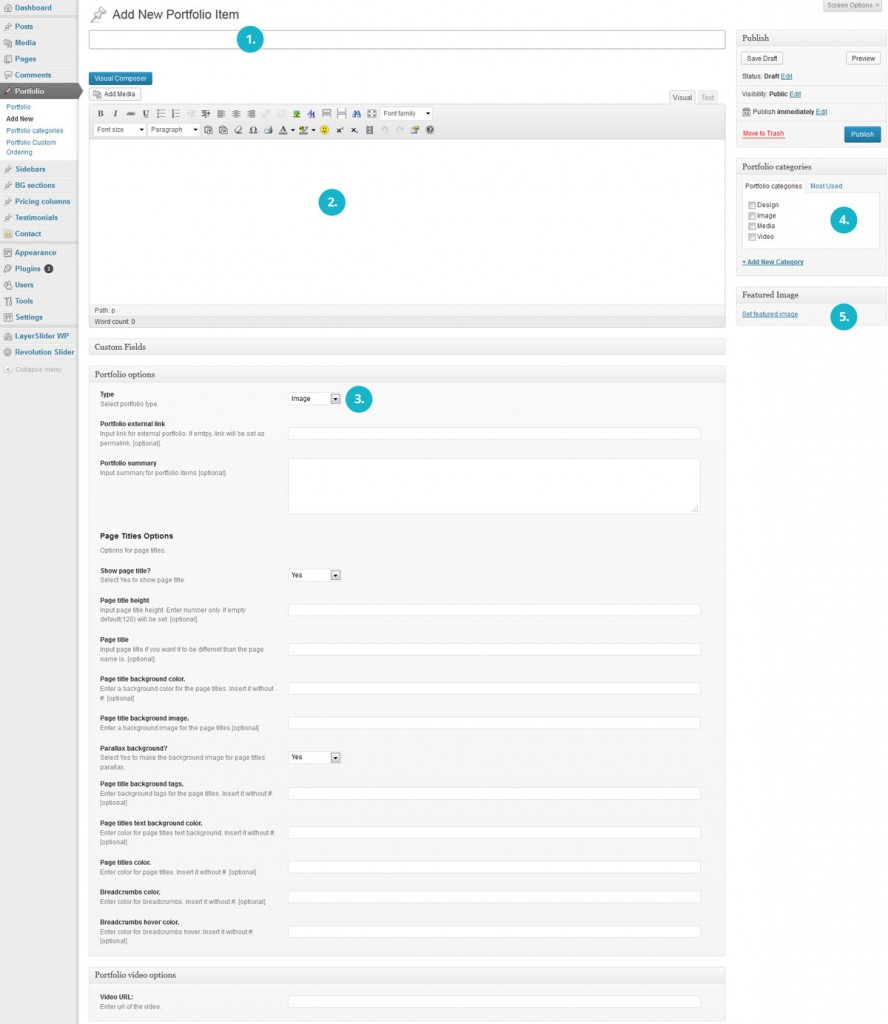
Create Portfolio item
All portfolio items can be created custom, so there is no default template. With visual composer you can achieve different layouts, designs and unique descriptions.
Please check image and video below.
- Add new Portfolio (Portfolio -> Add New)
- Write portfolio title
- Create page content (you may use classic WordPress Editor or our Custom Visual Composer)
- Insert content with TinyMCE Advanced visual editor
- Scroll down to see some extra options for Title options (optional)
- Save
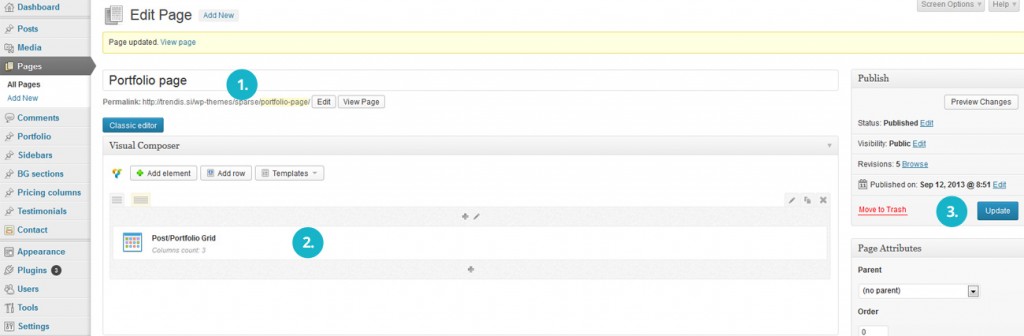
Create Portfolio page
Creating portfolio pages is really easy. First you have to create some portfolio items so that your visitors can see something. For presenting your projects you have different views avaiable. Please see video below.
- Add new page (Pages -> Add New)
- Write page title
- Click on Visual Composer button
- Insert (click) on the builder element called “Post/Portfolio Grid”
- Choose options what you want – see video below
- Save
Create Blog posts
Creating blog posts with Sparse is very easy. For more info about how to create them check the image and video below.
- Add new post (Posts -> Add New)
- Write post title
- Create post content (you may use classic WordPress Editor or our Custom Visual Composer)
- Insert content with TinyMCE Advanced visual editor
- Choose post format on the right
- Write Excerpt
- Set featured image or images
- Save
Create Blog page
- Add new page (Pages -> Add New)
- Write page title
- Click on Visual Composer button
- Insert (click) on the builder element called “Post/Portfolio Grid”
- Choose options what you want – see video below
- Save
Create custom page titles
You can use default page titles or create with background image or parallax background. Also you can set background colors for titles and breadcrumbs.
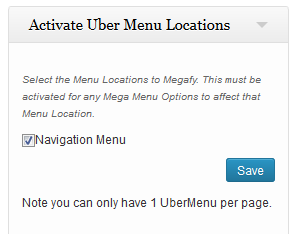
UberMenu Plugin
Theme Sparse includes plugin called Ubermenu, with which you can create beautiful layout and styles for your menu. An Extension of Ubermenu plugin is also added. This will make your menu stick to the top of your browser when scrolling.
To activate Ubermenu go to your WordPress admin: Appearance -> Menus. In the left top corner you will see a window Activate Uber Menu Locations. The checkbox in there needs to be checked for the UberMenu to get active (see image on the right side).
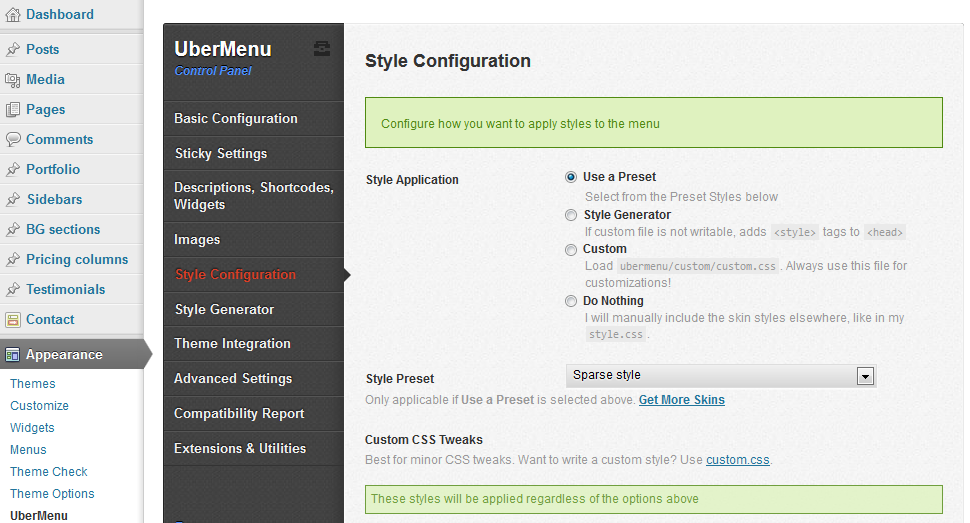
We have predesigned a style for Sparse Ubermenu. You may activate it by going to your admin: Appearance -> UberMenu -> Style Configuration. In section Style Preset select Sparse style.
LayerSlider Plugin
Sparse theme includes LayerSlider. The slider is included in the theme package so you do NOT need to buy it! Entire documentation for it is added as well. Click on the images below to go to the LayerSlider details.


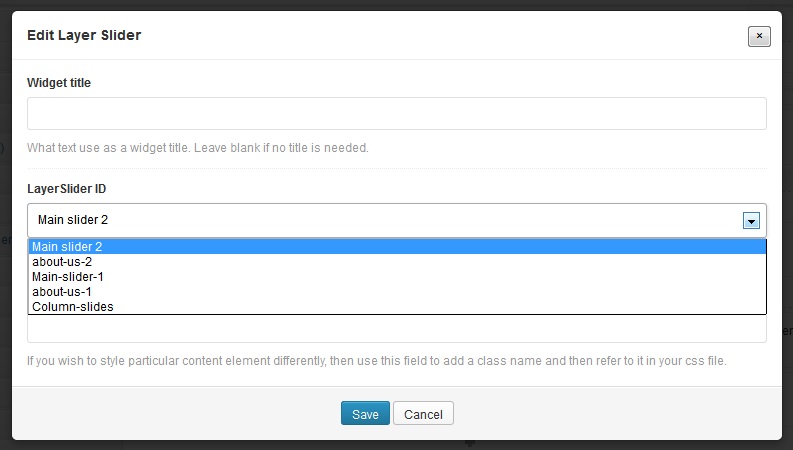
Once you have created at least one LayerSlider you may use it within the Visual Composer. Do do so just use the element called “Layer Slider”. From the dropdown select the slider you want to use.
Contact Form 7 Plugin
Contact form 7 plugin is included in the Sparse theme. Using it you can create unlimited contact forms with field that suit your needs (captcha, inputs, checkboxes, validations, ..).

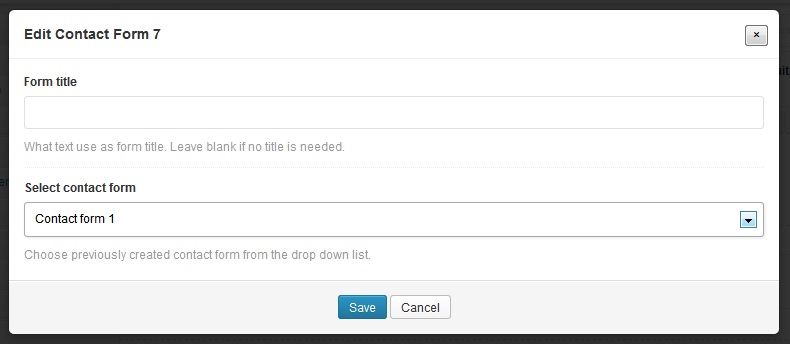
Once you have created at least one Contact form you may use it within the page builder. To do so add element called “Contact Form 7”. In the pop up select form you want to use.
Theme Options